Sunday, May 20, 2018

Scotchathon Sweet and Savory Chicken Meatballs

I've neglected to post this recipe for a shamefully long time (gotta love the hustle-and-bustle and lack of work-life balance that happens during the legislative session). Alex's birthday is toward the end of February, and for the past 5 or 6 years, he has thrown himself a party affectionately named "Scotchaton." In addition to providing multiple scotches for guests to enjoy, Alex also provided beer, wine, other liquor, and lots of food from Costco - including a full ham.

Alex opted not to throw Scotchathon this year because of the cost, but he seemed really bummed about it. There's nothing sadder than a 6-foot 4-inch bearded man mourning the loss of scotch, so I schemed with his friends to throw a surprise Scotchathon. Thanks to my new (since January) medical diet, in addition to needing to hide alcohol, supplies, and planning, I also had to make the food myself to ensure that there was some food I could eat at Scotchathon.

(As an aside, I've found parties and other social events to be one of the most challenging parts of treating illness through nutrition. More on that later.)

Some of Alex's friends helped me out by scheduling a board game night about a week before the party, but that left me with just one night to myself to purchase everything and cook everything. Unfortunately, that same group of friends also ruined the surprise by asking Alex about a friend from another group of friends, which tipped Alex off that something was up. (I will never forgive you Michael Graham, and I plan to haunt you after I die.)


Nevertheless, it was a really fun night. We had friends come in from multiple other states, booked a beautiful space, and crushed 9 bottles of scotch. Furthermore, I had other friends with food restrictions (vegetarian, celiac's, other autoimmune disorders, and gout) comment that they had plenty of food they could eat, and that it was all delicious. Party food success! Many thanks to Sarah Olivier and Chris Revel for help securing the space, setting up, and letting me prep the food in their apartment before the party.

The recipe below is one I made up to be Whole30, freezable, fast and easy to prepare, and appropriate for a large party with lots of drinking.


Scotchathon Sweet and Savory Chicken Meatballs
Servings: 16 (assuming 3 meatballs per person)
Time: 45 minutes - 75 minutes (15 minutes active)

Ingredients
2 1-lb packages of Coleman Basil and Roasted Garlic Meatballs (purchased at Costco)
3 red or orange bell peppers
2 tbsp. high-heat cooking oil such as coconut oil, avocado oil, or lard
1 tbsp. olive oil
8 cloves of garlic
1 cup mashed sweet potato
1/4 cup sundried tomatoes (soaked if not packed in oil)
balsamic vinegar to taste (approx 1 tbsp.)
1-2 cups water
1 tbsp. dried basil
1 tsp. dried oregano
salt to taste
pepper to taste
chopped parsley

Directions

1) Roast your bell peppers.
    a) Preheat oven to broil. Set rack as close to the broiler as possible.
    b) Cover a large cookie sheet with aluminum foil.
    c) Cover your peppers with high-heat cooking oil.
    d) Broil your peppers, turning once each side becomes black until peppers are charred all over.
    e) Put peppers in a paper bag set inside of a bowl and turn down the top of the bag to seal.
    f) Allow peppers to steam until cool enough to handle, approximately 20 minutes. 
    g) Remove peppers and place on a cutting board. Use your fingers to peel off the charred skin.
    h) Cut open peppers and remove seeds, ribs, and stems.
    i) Throw roasted bell peppers into your blender or food processor.


2) If needed, cook your sweet potato.
    a) Adjust oven heat to 400°F.
    b) Line a heavy pan with foil.
    c) Pierce a sweet potato a number of times with a fork.
    d) Place sweet potato on lined pan and bake for 45 minutes, or until soft.
    e) Cut sweet potato in half and scoop out flesh.
    f) Mash flesh with a masher or fork, and measure a cup.
    g) Add the cup of mashed sweet potato to the blender or food processor.


3) Cook your garlic.
    a) Heat olive oil over medium-low in a small pan.
    b) Crush cloves of garlic with the back of a heavy knife.
    c) Throw garlic into hot oil and let it sit for 1-2 minutes until starting to turn golden.
    d) Pour garlic and oil into the blender/food processor.


4) Blend into a sauce.
    a) Add sundried tomatoes, balsamic vinegar, basil, oregano, and one cup of water to blender with the sweet potato, garlic, and roasted peppers.
    b) Make sure the top of your blender is secured, and hold in place with a dish towel so that you don't burn yourself as steam escapes.
    c) Blend, starting on low and slowly moving to high power, until a silky consistency.
    d) Add more water if necessary until you reach the thickness you desire.
    e) Add salt and pepper to taste.


5) Heat.
    a) Pour sauce into a large soup pot or crock pot.
    b) Add meatballs.
    c) Cover and heat over medium-low, stirring occasionally until meatballs are covered in sauce and heated through.

6) Serve.
    a) For a party, put the meatballs and sauce in a chafing dish, sprinkle chopped parsley on top for color, and serve with toothpicks.
    b) For an easy dinner, serve meatballs and sauce over cooked spaghetti squash, zucchini noodles, or cooked pasta.


In case you are interested in tips appetizer tips for large parties where individuals have special dietary needs, this is what I served:

  • Sweet and Savory Chicken Meatballs
  • Aidell's chicken & apple sausages (also purchased at Costco) warmed in Paleo bbq sauce
  • Assorted vegetarian appetizers from Costco or Trader Joe's such as spanakopita, black bean taquitos, and veggie pot stickers
  • Beef skewers (using boneless short ribs purchased from Costco) marinated in pineapple juice and served with Paleo teriyaki dipping sauce
  • Shrimp cocktail with Paleo cocktail sauce
  • Guacamole (I used the Spicy one from Trader Joe's that comes in a square container), Pico de Gallo (bought at Costco), and Cassava chips
  • Crudite and Paleo ranch dip
  • a fruit platter
  • I also catered some panini sandwiches and pasta salad from a nearby deli


Wednesday, February 21, 2018

Warm and Bright Breakfast Hash

In early January, I began a Whole30 diet. It wasn't my first Whole30, but it was decidedly different from those that preceded it.

You see, for many people, Whole30 is a way to reset cravings and improve energy levels and digestion. The first few days feel like death as your body withdraws from quick-burning carbs. But, if you stick with it, 2 weeks in you'll start feeling like you can single-handedly write, produce, direct, and star in a feature film over the course of one day and still get dinner on the table by 7pm.

This Whole30 was different for me because I felt like death before I even started. I spent much of fall and winter on a downward spiral of fatigue, brain fog, insomnia, anxiety, depression, aches, chills, and various stomach pains. When I spent most of Christmas day sick as a dog and realized that I had taken a sick day at least once a week for the entirety of December, it was time for something to change right away. Hence, the Whole30: a hail-Mary attempt to become functional again.

Shortly after, I was diagnosed with Hashimoto's Thyroiditis. The diagnosis came following countless blood tests, two surgical procedures, three ultrasounds, and genetic testing. Hashimoto's is an autoimmune disorder wherein your body attacks the thyroid gland and anything else that it might mistake for markers on the thyroid such as gluten and casein. After receiving the diagnosis, I spent a solid three days wondering if life without macaroni and cheese is worth living.

When I finally stopped feeling sorry for myself, I realized that Hashimoto's is (right now) far less bad for me than for others. For one thing, I'm pretty adept in the kitchen, so needing to make foods from scratch isn't a problem. For another, I have an understanding employer who lets me work at the pace I need. Finally, I'm blessed to have excellent health insurance that covers all the crazy tests I need regularly now such as nutritional deficiency testing, antibody levels, etc.

All that is to say that over 50 days later, I'm still on that Whole30. I've yet to hit that feeling of invincibility. Hell, I've yet to hit a feeling of "okay this isn't bad." But I'm going to work 5 days a week again, my insomnia is mostly gone, the aches and fatigue are milder, and I even took a short walk with my dogs for the first time in 2018!

The following recipe is one I made to enjoy for a nice Sunday brunch, because Hashimoto's cannot and will not beat the bougie out of me. The warm spices and bright citrus are a fabulous complement to fennel and sweet potatoes. This meal is best enjoyed with comfortable company, and it would be great with a mimosa (or two or three) for those who are not following a Whole30.

Warm and Bright Breakfast Hash
Servings: 2
Time: 45 minutes

Ingredients
1 bulb of fennel, chopped
1 sweet potato, chopped
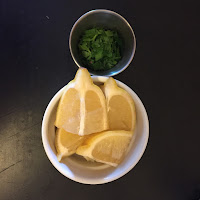
1 lemon, zested and cut into quarters
2 tbsp. coconut oil
1.5 tsp. ground mace
1.5  tsp. ground ginger
1 tsp. ground cardamom
salt and black pepper to taste
olive oil
pint grape or cherry tomatoes
4 breakfast sausage links
4 eggs
parsley, chopped

1) Prepare your hash.
    a) Preheat oven to 450°F.
    b) Cover a large cookie sheet with parchment paper.
    c) Melt your coconut oil (if necessary).
    d) Combine chopped fennel, sweet potato, and lemon zest in a large bowl with coconut oil, mace, ginger, cardamom, salt, and pepper. Toss well until spices are evenly distributed over the veggies.


    e) Spread your vegetable and spice mixture on the cookie sheet.
    f) Add your sausage links to the cookie sheet and roast veggies and sausages for 20 minutes.

    g) Flip your vegetables and sausages after 12 minutes. Continue to roast for another 8 minutes.

2) Prepare your tomatoes.
    a) Toss grape or cherry tomatoes with a touch of olive oil and season with salt and pepper to taste.
    b) After 20 minutes of roasting the vegetables, throw the tomatoes onto the pan with the chopped veggies and sausage.

    c) Roast for 12 more minutes or until the tomatoes burst.

3) Prepare your eggs.
    a) Heat a skillet on the stove at medium-low heat. 
    b) Add some olive oil to the skillet once it's warm.
    c) Crack in your eggs.
    d) Once the eggs start to turn white, cover the skillet and let your eggs steam until the whites are just set but the yolks are still runny. 

4) Assemble.
    a) Divide the tomatoes and vegetable hash between two plates.
    b) Add two sausage links to each plate.
    c) Squeeze 1/4 lemon over each plate of hash.
    d) Top each plate of hash with two sunny-side up eggs.
    e) Squeeze another 1/4 lemon over the eggs. (I know this sounds weird, but the acidity cuts the yolk really nicely).
   f) Season the eggs with salt and pepper if desired, and garnish with chopped parsley.


Wednesday, July 15, 2015

Fiori di Zucca "Fritti" Pappardella

I have a love affair with Italy. I've already been to Italy 4 times in my life, and there's so much to love about it. I love the quiet mountains and unassuming castles of Sudtirol where Mediterranean cuisine meets German cuisine. Then there's the winding canals lined with colorful apartments that ultimately give way to massive baroque churches in Venice; I had one of the best meals of my life (a briny pasta dyed in cuttlefish ink and served with the freshest mussels imaginable) near St. Mark's Basilica. I love the sunflowers and terra cotta stands that stretch throughout Tuscany and the multiple dinner courses made of wild game. And how can you forget the gelato sundaes and amazing iron work by Pisano and Ghiberti in Florence?

My love does not extend to Rome.

I find Rome to be unnecessarily busy and crowded and loud. Not to mention dirty. And covered in bombastic buildings. But what I found most disappointing about Rome is that (while tasty) so much of the traditional Roman food feels uninspired. I found one notable exception-- Roman Jewish food.

Roman Jews were once confined to a walled-off ghetto near the river. Because they lived in such poverty, they created dishes out of cheap and easy-to-grow ingredients. These included lots of fish because they could be gathered from the river, and lots of artichokes and zucchini because they grew plentifully in the Roman soil and climate. The area is now known as possibly the most culinarily exciting in Rome.

Okay, okay. So SOMETIMES Rome is pretty.
One of the best-known summer delicacies of Roman Jewish cuisine is fiori di zucca fritti: zucchini blossoms stuffed with mozzarella cheese and anchovies and then battered and deep fried. The recipe below is adapted to capture the flavors of this dish without the unhealthy parts. I heavily borrowed from this Orangette blog post but changed the recipe to incorporate the savory-umami anchovies and crispy fried texture. This meal was so deeply satisfying that I have already made it twice. Plus it uses up an abundance of summer CSA zucchini.

Fiori di Zucca "Fritti" Pappardella

Ingredients
     1 1/2 lbs. zucchini or yellow summer squash
     1 tbsp. table salt
     1/2 red onion
     1 carrot
     1 stalk celery
     Leaves from 10 stems Italian parsley
     12 zucchini blossoms
     1 tbsp. + 1 tbsp. good quality olive oil
     1 tbsp. ground flax
     1 tbsp. almond meal (or 2 tbsp. almond meal if you don't have ground flax)
     Pinch red pepper flakes
     1 tsp. + 1 tsp. kosher salt or maldon salt flakes
     6 anchovy fillets or 1 1/2 tsp. anchovy paste
     Pinch (6-10 threads) saffron
     2 cups + 3 tbsp. good quality chicken stock
     1 large egg yolk
   

1) Make your zucchini papparadella.
     a) Slice squash in half lengthwise.
     b) Using a mandoline set to 1/16", slice cut side of squash lengthwise to make long, wide noodles.
     c) Cut noodles in half again lengthwise.
     d) Place noodles in a colander and toss with 1 tbsp. salt.
     e) Let noodles sit for 20-30 minutes to drain liquid.
     f) Rinse noodles thoroughly.
     g) Dry noodles between two paper towels.
     h) Put noodles back in the colander and place uncovered in the fridge until you're ready to use.


2) Prepare your veggies.
     a) Cut carrot and celery into quarters.
     b) Place red onion, carrot, celery, and parsley leaves into food processor.
     c) Pulse 20 times, scrape down sides, and pulse 10 more times until finely chopped. (Alternatively, you can finely chop all these ingredients by hand.)
     d) Roughly chop zucchini blossoms into quarters or eighths.
These are zucchini blossoms. They are usually only available late June-late July and can be found in specialty grocery stores or your local farmer's market.


3) Make your fried topping.
     a) In a small pan, heat 1 tbsp. olive oil over medium heat.
     b) When oil is hot, add ground flax, almond meal, a pinch red pepper flakes, and a pinch salt.
     c) Stirring constantly, toast your seed/nut meals until dark brown and, well, toasty.
     d) Put on a plate or in a small bowl and put to the side until later.


4) Make your sauce.
     a) In a larger pan, heat 1 tbsp. olive oil over medium-low heat.
     b) While oil is heating, in a small pan over low heat, warm the 3 tbsp. chicken stock.
I used anchovy paste
Here you can see the paste entirely
dissolved into the hot oil
     c) In a small bowl, beat the egg yolk with a fork.
     d) When oil is hot, add anchovies or paste. Cook until the fish is dissolved into the oil.
     e) Add chopped onion, carrot, celery, and parsley. Cook until tender, about 5 minutes.
     f) Add zucchini blossoms, a pinch salt, and the saffron. Lightly crush the saffron between your fingers while you add it.
     g) Stir, turn heat up just past medium, and then add 3/4 cup of chicken stock. Stir again.


5) While your sauce is cooking, make your pasta.
     a) Heat another frying pan with 1 tbsp. olive oil over medium heat-low heat.
     b) When oil is hot, add the zucchini pappardella.
     c) Cook zucchini pasta for 3-5 minutes until starting to lightly brown.
     d) Set aside until ready to use.


6) Finish sauce.
     a) Once the chicken stock has started to boil off of the sauce, add the rest of the chicken stock a splash or two at a time and stir in. This process should take about 8-10 minutes.
     b) The sauce is done when the chicken stock has reduced down to a thin layer on the bottom of the pan.
     c) Whisk the warm 3 tbsp. chicken stock into the beaten egg yolk. This will make a pale yellow liquid.
Add the chicken stock sloooooowwwly
so it doesn't cook the egg

     d) Remove the sauce pan from the heat and add in the egg yolk mixture. Stir well to coat vegetables and mix into liquid.
     e) Using tongs or a pasta spoon, lift the zucchini noodles and add them to the sauce mixture.
     f) Return to heat and cook 30 more seconds, stirring constantly. You want the sauce to cover the noodles.


7) Serve.
     a) Divide zucchini pasta and sauce onto 2 warm plates.
     b) Top with 1 tbsp. each of the fried seed/nut crumbs.
At its simplest, this is what the meal
looks like. Not the most appetizing thing, eh?

Suggestions to make this a meal:
     a) Fry some guanciale (cured pig jowl meat). Remove meat from pan, and instead of cooking your veggies in olive oil, cook them in the meat oil. Add the cooked meat back into the mix along with the zucchini noodles at the end to make it taste like a veggie-heavy pasta carbonara.
     b) Serve alongside a seared veal cutlet.
     c) If you are not lactose intolerant, make it more similar to Roman Jewish Fiori di Zucca Fritti by adding some torn up pieces of buffalo mozzarella like I did here. Yum!
 
Add some parsley, tomatoes, and buffalo mozzarella and it's suddenly beautiful! Delizioso! Translation: nom nom nom


Wednesday, July 23, 2014

Scarborough Fair Crème Brûlée

It was April, 2011. My boyfriend and I had just bought ice cream and were taking a walk around town. The trees in New Haven were bursting with pink blossoms. While I thought to myself "could life get any better?" my boyfriend trudged next to me, despondently. I couldn't figure out what was eating him until I realized that it was Easter. Although he was never religious, it was his first Easter where he didn't go home and celebrate with his family.

We got back to the apartment around 2pm, and I made an excuse that I needed something from the pharmacy. From there I frantically drove to four different grocery stores, desperately trying to find one that was open. Finally I discovered a budget grocery store that wasn't closing for another 20 minutes. My time and my options were limited, but I found 10+ pound ham, potatoes, mostly edible green beans, a massive bag of shredded cheese, etc. Three hours later a passable Easter dinner was on the table and our friends gathered round.

The boyfriend didn't last, but the tradition of making Easter dinner for my friends did.

I've since added giving my friends small Easter baskets like this:

(Almost) completely edible flower pots!
And the meals have become more elaborate, consisting of multiple courses and wine pairings.
Food Porn
But I'm wandering away from the point. The point is, I made an awesome crème brûlée this year. It was inspired by a cocktail that my super-talented friend Ed created. (For those of you that live in New Haven, Ed bartends at Heirloom. Do yourself a favor and order a drink from him. You won't regret it.)

Scarborough Fair Crème Brûlée

yield: 8 servings

     Ingredients:
     1 tsp. chopped rosemary
     1 tsp. thyme leaves
     1-2 tsp. chopped sage
     1 tbsp. chopped parsley leaves
     2 large lemons
     3 cups heavy cream
     Pinch of salt
     10 tbsp. turbadino sugar (like Sugar in the Raw)
     6 large egg yolks
     1/2-1 tsp. vanilla

     Equipment:
     8 (4-oz) flameproof ramekins
     Blowtorch (preferable)
     Fine-mesh strainer

1) Preparation.

     Directions:
     a) Preheat your oven to 325 degrees F.
     b) Grate the skin of each lemon using a zester and reserve.
     c) Juice your lemons and reserve juice.
     d) Chop your herbs.
2) Make the custard.

     Directions:
     a) In a heavy 2 or 3 quart saucepan, stir together cream, lemon zest, and herbs. Heat over medium-low heat, stirring.
     b) Once cream is warm, add in 7 tbsp. sugar and a pinch of salt. Keep stirring.


     c) Heat and stir until the cream is almost boiling. It will be 180 degrees F. Remove from heat, cover, and steep 10 min.
     d) After cream has steeped, strain the cream into a large bowl and throw away the herbs.
     e) Lightly beat egg yolks in a separate bowl.
     f) Add a tablespoon of the warm cream to the yolks and mix. Repeat two or three more times to temper the eggs.
     g) Add the beaten yolk and cream mixture to the strained cream and whisk.
     h) Add in 1 tsp. lemon juice and vanilla. Whisk some more.

3) Cook the custard.

     Directions:
     a) Divide the custard among the 8 ramekins.
     b) Place the 8 ramekins in a deep cake pan or roasting pan. They should not touch.
     c) Boil some water and pour it in the pan about halfway up the ramekins. Be careful not to get water in the ramekins.
     d) Bake until the custards are set around the edges and only wobble a little in the center when the pan is shaken, 30-40 min.
     e) Let the whole pan (water and everything) cool for 20 minutes or so.
     f) Remove ramekins and chill (uncovered) in the refrigerator 4 hours or overnight.

4) Fire it up!

     Directions:
     a) Place ramekins on a flame-retardant surface.
     b) Evenly sprinkle 1 tsp. sugar over each custard.

     c) Carefully move a blowtorch set at a medium-low flame across each ramekin, slowly and evenly, until all the sugar is caramelized. If you don't have a blowtorch, you can put the ramekins on a pan and stick them under the broiler in your oven, watching them carefully to keep from burning. If you don't have an oven, a basic torch lighter (like what you use to light a grill) will work too, although much more slowly and much less evenly.

     d) Allow custards to sit for 3-5 minutes to harden the candy shell.
     e) Garnish with an herb sprig.


Too much company wore this puppy out!

Sunday, April 13, 2014

Kicky Beet Salsa

Oh Trader Joe's. You are truly the love of my life. I can go hog-wild buying stuff I don't actually need (every kind of nut seasoned with wasabi? Don't mind if I do) and never break $100. So when I saw these Horseradish-Cheddar Kettle Chips, I had to have them. It doesn't matter that I'm not a huge chip fan. It doesn't matter that I'm not really a snacker.


I. Had. To. Have. Them.

I grinned like a crazy person bringing my treasure out of the store. Then they sat on my self. And sat some more. They were still sitting a month and a half later.

Every time I looked at those chips I felt guilty. I felt like I was being a horrible partner to Trader Joe's. Every time I went in that store I could swear all the happy people in Hawaiian shirts would suddenly stop smiling and glare at me knowing that I wasted one of their marvelous creations without even trying it. They knew. Just like grandmas always know when you don't wear the sweater they knit for you, Trader Joe's knew.

It was time to remedy my guilt. So for a girl's scrapbooking night I came up with this salsa recipe to complement the chips. The two were delicious together. But here's a little secret: the salsa is delicious without the chips, too. The salsa was delicious on top of tilapia. It was delicious with lamb. Heck, it was delicious off a spoon when I waited too long to cook dinner and was ravenous before the timer went off.

It has the perfect amount of kick to it from the horseradish, but the beets lend plenty of earthy sweetness. So here's a recipe to "kick it up a notch." (I hate myself for saying that.)

Kicky Beet Salsa Instructions

yield: about 4 cups
   
1) Roast your beets

     Ingredients:
     4 small to medium beets

     Directions:
     a) Preheat oven to 400 degrees F.
     b) Slice off beet greens and wash beets.
     c) Place beets together in an aluminum foil packet. Place packet on a baking sheet.
     d) Bake packet for 50-60 min until the beets give slightly.
     e) Let beets cool enough that you can comfortably touch them.
     f) Rub off skin with your fingers.
     g) Roughly dice.

2) Mix your salsa

     Ingredients:
     3 tbsp. grated fresh horseradish or 2 tbsp. prepared horseradish
     1/4 cup chopped fresh dill
     salt to taste
     2 tbsp. fresh lemon juice
     2 tbsp. minced shallots
     1/2 green apple (roughly diced)
     2 tbsp. extra virgin olive oil

     Directions:
     a) Place diced beets and all other ingredients in a food processor.
     b) Pulse in 1-second intervals about 20 times, stopping every 5 pulses to scrape down the sides.
     c) Alternatively, you can do all this without a food processor by chopping very finely.
     d) Empty into a container, cover, and chill at least 2 hours before serving.

3) Serve with chips, on fish, on chicken, on steak, on celery, on a spoon...

For a less messy (but perhaps not as pretty) salsa, you can use golden beets instead of red beets. It will taste the same.

Friday, March 7, 2014

Man Cakes #1

MAN CAKE!!!!!!!!!!!
I used leopard-print wrappers because leopard is a neutral. Every man likes leopard. Okay, maybe it's just me that likes leopard, but I've never had anyone refuse a cupcake and then throw it at me because of not liking the wrapper.


I named this cupcake "Man Cakes #1" because "Man Cakes" is such a great name I'm sure I'll use it again.

Bus+Stripper Pole=Party Bus
I made this cupcake originally for my brother's bachelor party. That's right-- it was a co-ed bachelor party, and I was his "Best (Wo)Man." It was pretty much the perfect party. We drove to San Diego from LA where we met about 20 of Chris's friends and hopped onto a party bus. The driver was wearing a pin-striped vest, tight jeans, and a fedora; and the bus had poles running through it. The only thing these could possibly be for is sexy dancing, which my brother's female boss proceeded to do. Our driver took us to 3 of San Diego's best breweries: Green Flash, where we had a tour; Stone, where we ate lunch; and Lost Abbey, where we tried our best not to fall asleep from too much alcohol. I gave these cupcakes out after Lost Abbey to try and revive everyone. We were supposed to go to Mission as well, but never made it to the last one. Once we had all cleaned up/napped, we headed out to a gastropub for dinner. We ate outside in the beautiful, warm San Diego air, and everyone made a speech for my brother. From there we ended up at an Irish bar/dance club, and the night ended with quesadillas sometime around 3:30am.

My brother (aka: the bachelor), my father (Yes! Even Daddy was invited to the bachelor party!) and me at Lost Abbey
Because we were traveling, I baked the cupcakes in jars for my brother's bachelor party. Instructions on how to do that can be found here.

The second time I made these cupcakes was for my friend Alex's birthday. Alex and I met about a year-and-a-half ago at a mutual friend's birthday party. We started talking when I noticed his shirt said "BaconStripsandBaconStripsandBaconStripsandBaconStrips." From there we discovered our shared love of beer, and we've been spending time together ever since. A couple days after his birthday, he came over to meet some of my other "beer friends" and we toasted him with beer and bacon-themed snacks, including this one.

Man Cakes #1 Instructions

yield: 10 cupcakes

1) Prepare the cupcakes

     Ingredients:
     1 cup scotch ale (I used Old Chub by Oskar Blues for Alex's birthday. Don't remember the one I used for Chris's bachelor party, but it was something from San Diego)
     1 tsp. apple cider vinegar
     3/4 cup brown sugar (light or dark is fine)
     1/3 cup baking oil (I used avocado but canola would work well, too)
     1 1/3 cup all purpose flour
     3/4 tsp. baking soda
     1/2 tsp. baking powder

     Directions:
     a) Follow instructions #1-4 for hipster PBR cupcakes found here. But use scotch ale, not PBR.
     b) Let cupcakes cool on wire racks.

2) Cook some bacon!

     Ingredients:
     1 lb. high-quality bacon (I used the applewood smoked bits and ends from Trader Joe's)

     Directions:
     a) Preheat a large pan over medium heat.
     b) Chop your bacon into pieces about 1/2 inch across.
     c) Add bacon to pan and cook, turning occasionally until crisp (about 6-7 minutes). You may need to do this in batches.
     d) Remove bacon from pan using a slotted spoon and place in a bowl. Chop if any of the pieces are still too big to put on top of cupcakes (as crumbles).
     e) Reserve bacon drippings by placing 4 layers of cheesecloth over the top of a glass jar and straining the cooled drippings through the cheesecloth. Do not put your drippings in the fridge yet, because you want them room temperature.

3) Glaze your cupcakes.

     Ingredients:
     1 tbsp. liquid bacon drippings
     1 tbsp. maple syrup

     Directions:
     a) Poke holes in your cooled cupcakes using a toothpick. Aim for 7-10 holes per cupcake.


     b) Mix together the bacon drippings and maple syrup in a small bowl.
     c) Using a 1/2 tsp. spoon, pour bacon-maple mixture over each cupcake slowly enough so that it can seep into the holes. Some may spill, so it's helpful if you leave the cupcakes in the pan for this to catch any spills.

     d) Store any leftover bacon drippings in the fridge and use them in place of butter or olive oil in almost anything--for frying quesadillas, for scrambling eggs, for putting on top of toast.... Okay, I'm kidding about that last part (maybe).

4) Mix your maple cream cheese frosting. Note: The following recipe is adapted from one you can find here.

     Ingredients:
     8oz cream cheese, softened
     8oz unsalted butter, softened
     1 1/2 cups powdered sugar 
     3 tbsp. maple syrup

     Directions:
     a) Using an electric mixer, beat your cream cheese and butter together until combined and smooth.
     b) Add in the maple syrup and beat until combined.
     c) Add in the first 1 1/2 cups powdered sugar and beat at high speed until light and fluffy.
     

5) Assemble your parts.

     Ingredients:
     10 glazed scotch ale cupcakes
     maple cream cheese frosting
     bacon crumbles

     Directions:
     a) Using either a star-tip or a round-tip, pipe frosting onto cupcakes.
     b) Top with crumbled bacon bits. 
     c) Unzip your pants, scratch a little bit, and eat your cupcake like a man.
The birthday man (Alex) with his MAN CAKE


Thursday, February 13, 2014

I Love You (Snow-day) Soup

About once or twice a winter, Connecticut gets hit with a bad snowstorm. Today is one of those days. Since my schedule has been so crazy recently, I decided to take today (mostly) off from doing work and instead take down my Christmas decorations (Valentine's Day is tomorrow--it is time) and cook myself some nice meals to prepare for the weekend.


My snowy valentines! My loves got bacon leftovers.
As I looked around my refrigerator, I realized that I had the makings of a French Onion soup. I also had bacon. Is there anything that bacon doesn't improve? So after some poking around at various recipes online, this is what I did with my snow-day. The soup takes a LONG time to cook, which is what makes it perfect for days when you can't really do much else. It's also perfect for a Valentine's Day lunch because it's fancy (it has to be-- it's French!), riiiiiiiiiiiiiiiich, and warming.

I Love You (Snow-day) Soup

serves: 2

1) Cook some bacon!

     Ingredients:
     1 lb. good quality bacon (I used a maple brined bacon from Vermont, which I bought at Whole Foods)

     Directions:
     a) Preheat oven to 325 degrees F.
     b) Line a 9x13 (or bigger) baking pan with aluminum foil.
     c) Fill pan with bacon strips (should be tightly packed to render more grease).
     d) Cook until crisped but still pliable (usually about 25-30 min).
     e) Remove bacon to a plate lined with paper towels and save the bacon grease (you need 2 tbsp.).
     f) You'll need the bacon grease and 3-4 slices of bacon. The rest of the bacon can be saved for morning-after-Valentine's Day brunch.

2) Caramelize your onions.

    Ingredients:
   2 tbsp. salted butter
   2 tbsp. bacon grease
   2 sweet onions
   1-2 garlic cloves
   2 sprigs thyme
   1 bay leaf
   salt and pepper to season
      
     Directions:
     a) Slice your onions in half (longways) and then into thin half-moons. I used my food processor but a mandolin will also do the trick.
     b) Mince or press your garlic cloves. I recently bought this press, and I'm obsessed with it.
     c) Melt your butter and bacon grease together in a soup pan set over medium-low.
     d) Add onions, garlic, thyme, bay leaf, salt, and pepper and stir to coat.
     e) Allow these to cook for a LONG time, stirring occasionally. Go read a book for at least an hour. When you are done, all the onion pieces should be at least slightly brown and very soft.

Before and after the caramelization process. The burnt pieces are normal, I swear.


3) Make your soup base.

     Ingredients:
     1/2 cup red wine (I used Merlot because I have a box of it open. DON'T JUDGE ME! You could also use white wine or beer depending on what cheese you're using.)
     1 heaping tbsp. all-purpose flour

     Directions:
     a) Turn stove heat up to medium.
     b) Add in red wine and stir to mix with caramelized onions.
     c) Allow to boil until wine boils off and onions dry, about 5-10 min. The onions will appear somewhat burnt. This is ok.
The onions getting darker because of the wine. Note that there will still be moisture from the oil, but the wine moisture should be gone.
     d) Remove bay leaf and thyme sprigs.
     e) Turn stove heat back down to medium-low.
     f) Add in flour and stir to coat onions.
     g) Cook for about 10 minutes, stirring regularly, to remove the flour taste from the onions. The onions will start to look crispy and burnt-fried when you do this. The dark color comes from the caramelization and the wine, so don't worry about this.
Make sure you cook the onion/flour mixture on low enough heat so that the burnt look is not *actually* burnt. But yeah, it will look pretty bad. Do not despair.


4) Make the soup.

     Ingredients:
     3-4 pieces of bacon, crumbled
     Quart of beef broth
     Salt and pepper

     Directions:
     a) Turn stove heat back up to medium.
     b) Add in bacon and broth.
     c) Bring to boil, and boil for 10 min.
     d) Taste, and season with salt and pepper as needed.
The wine and caramelization give your soup a beautiful color, and the flour gives it just enough thickness.


5) Make the croutons.

     Ingredients:
     4-6 slices baguette or Italian loaf (You need enough slices to fill up the top of an oven-safe bowl or ramekin. I always keep the partially baked Figelle from Trader Joe's in my freezer, so I used that.) 
    4-ish slices of melting cheese. Emmental and Gruyere are traditional. (I used Raclette because I love the heartiness of it. Really, any cheese that melts well will work. You could even use sharp cheddar, but then the onions should be cooked in a dark, malty beer rather than wine. Actually, that sounds delicious. Consider this post to be me patenting that idea.)
    2 tbsp. grated cheese such as Parmesan or Gouda (I grated up some smoked Gouda to go with the bacon.)

     Directions:
     a) Preheat oven to 350 degrees F.     
     b) Lay your slices of melting cheese on top of your bread slices. They should be sized to match.
     c) Fill 2 oven-safe bowls or ramekins with soup.
     d) Float your cheese-topped bread on top of soup. You can use additional cheese to fill in any gaps.

     e) Sprinkle with grated cheese.
     f) Bake for about 20 minutes or until cheese is melty and brown. It will likely puff up in the oven.
     g) Remove from oven (using mitts) and dig in. Be careful because it will be VERY hot. Much like your Valentine's Day love for your significant other. Or in my case, my Valentine's Day love for my Vitamix. 
     
If you want the top darker, stick it under the broiler for a skosh. I just prefer baking because it gives the bread some time to become one with the soup. And isn't that the point of Valentine's Day?